The right solar cable must match the power station’s connector, solar input limits, polarity, and panel wiring—not just the plug name. Here’s how to identify the correct cable before buying.
What do you need help with?
Open an answer, or tell us what we should cover next.
Answered in this guide
Buy a solar cable that fits your power station
Buy the right solar cable by matching the power station’s exact solar-input connector with the panel connector, then checking polarity and the station’s voltage and current limits. A plug that fits is not enough.
XT60 is a keyed two-pin connector commonly used on portable power stations, while Anderson connectors are another connector style used for power applications. The correct choice depends on the exact input port, not the connector name alone.
Check whether a solar cable’s electrical ratings are safe
Compare the solar panel or array’s voltage and current with the power station’s solar-input limits. A cable can physically connect while the electrical input is unsuitable, so connector fit alone does not confirm compatibility.
Choose a cable length that reaches without unnecessary slack and a wire size suited to the current and cable run. The goal is to avoid excessive voltage drop while keeping the cable practical to use.
Request a topic and help us choose what to build next.
Wire multiple solar panels without exceeding input limits
Test solar cable polarity and voltage with a meter
Calculate how long solar charging will take
Diagnose why a power station is not charging from solar
Requests help us prioritize the next guide. No email required.
One anonymous request per topic.
Anderson or XT60 solar cable that actually fits
The cable that fits your solar panel may not fit your portable power station. Before buying, match four things: the power station’s solar-input connector, the panel-side connector, polarity, and the panel’s voltage and current limits. A cable can look compatible and still fail to connect—or create a potentially unsafe setup.
Start with the power station’s solar-input port
Look at the label beside the input port or check the manufacturer’s manual. Common labels include:
XT60 or XT60i
Anderson
DC5521 or another barrel connector
A proprietary solar-input connector
An aviation-style or higher-current connector
Do not identify the cable only by color or appearance. Some connectors look similar but use different dimensions, pin layouts, or wiring.
If the manual specifies an exact cable type, follow that recommendation. The power station’s solar input may have limits that are not obvious from the connector itself.
XT60 versus Anderson: what is the difference?
XT60 cables
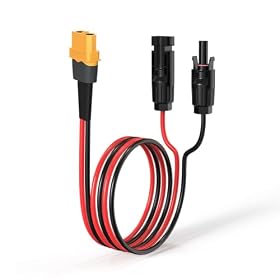
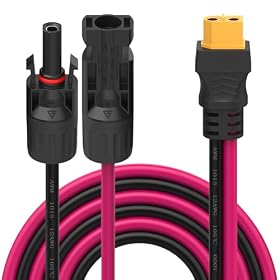
XT60 is a keyed, two-pin connector commonly used on portable power stations, batteries, and hobby electrical equipment. A cable described as “MC4 to XT60” usually has:
MC4 connectors for the solar-panel side
An XT60 connector for the power-station side
You still need to confirm whether the power station requires a standard XT60 or an XT60i-style connection. They may not be interchangeable in every application, particularly when the device uses an additional sensing or communication contact.
Anderson cables
“Anderson” describes a family of connector systems rather than one universal plug. Different Anderson families and sizes can differ in physical dimensions and current capacity. A cable for one Anderson connector may not fit another.
Check the exact connector family or the manufacturer’s cable description. Terms such as Anderson Powerpole, SB, or a stated connector size are more useful than the word “Anderson” alone.
Anderson connectors are often genderless in their housing design, but that does not mean every Anderson connector is compatible. The housing style, contact size, wiring, and keying still need to match.
Product prices and availability are accurate as of the date/time indicated and are subject to change. Any price and availability information displayed on Amazon.com at the time of purchase will apply to the purchase of this product.
Match both ends of the cable
A solar cable is usually described by its two connector ends. For example:
MC4 to XT60: for a panel with MC4 output and a power station with XT60 input
MC4 to Anderson: for a panel with MC4 output and a compatible Anderson input
XT60 to XT60: for equipment that already uses XT60 on both sides
Bare wire to XT60 or Anderson: for a panel or controller with loose leads, if the wiring is correctly terminated
Do not assume that a cable labeled “solar generator cable” fits all portable power stations. That phrase is too broad. The listing should identify the exact power-station connector and the panel-side connector.
Product prices and availability are accurate as of the date/time indicated and are subject to change. Any price and availability information displayed on Amazon.com at the time of purchase will apply to the purchase of this product.
Check polarity before connecting
Connector shape is only part of compatibility. The positive and negative conductors must be wired correctly.
Before connecting a cable:
Check the cable’s polarity diagram or manufacturer documentation.
Compare it with the power station’s input markings.
Confirm the solar panel’s positive and negative leads.
If polarity is unclear, do not guess or repeatedly plug it in.
A reversed connection can prevent charging and may damage equipment, depending on the design. Use a suitable meter only if you know how to check DC polarity safely. Otherwise, ask the cable seller or manufacturer to confirm the wiring.
Product prices and availability are accurate as of the date/time indicated and are subject to change. Any price and availability information displayed on Amazon.com at the time of purchase will apply to the purchase of this product.
Verify voltage and current—not just the plug
The connector may fit while the electrical input is unsuitable. Compare the solar array’s electrical specifications with the power station’s solar-input specifications.
Pay particular attention to:
Maximum solar-input voltage: The panel or combined panels must remain within the station’s permitted voltage range. Consider the panel’s open-circuit voltage, especially in cold conditions.
Operating voltage: The panel needs to produce a usable voltage for the station’s charge controller.
Maximum input current: The array should not exceed the station’s permitted current.
Maximum solar charging wattage: The station may limit total input power even when voltage and current are acceptable.
Series and parallel connections: Series raises voltage; parallel raises current. Either can exceed the input limits if configured incorrectly.
Use the values printed on the panel label or specification sheet, not only the advertised wattage. If several panels are connected, calculate the resulting voltage and current according to the wiring arrangement. When the numbers are close to the limit, leave a conservative margin and follow the power station manufacturer’s instructions.
Product prices and availability are accurate as of the date/time indicated and are subject to change. Any price and availability information displayed on Amazon.com at the time of purchase will apply to the purchase of this product.
MC4 connectors need special attention
Many portable solar panels use MC4-style connectors. These are not simply generic positive and negative plugs; the connector housing and contact arrangement matter.
Avoid forcing connectors together or mixing parts from incompatible connector systems. A panel may also use extension leads, branch connectors, or an adapter already included by the manufacturer. Trace the complete path from the panel to the power station:
Every connection in that path must be compatible and weather-appropriate for its location. Keep non-weatherproof adapters protected from rain and standing water unless their instructions specifically allow outdoor exposure.
Choose the right cable length and wire size
Longer cables create more voltage drop, particularly at higher current. Use the shortest practical cable that allows the panel to be positioned safely and effectively.
When choosing between similar cables, check:
Conductor size or wire gauge
Rated current
Cable length
Outdoor and UV suitability
Connector quality and strain relief
Whether the cable is intended for solar use
A thin, very long extension may reduce charging performance even when the connectors fit. Do not replace a manufacturer-supplied cable with a smaller cable simply because it is cheaper or easier to find.
A quick buying checklist
Before ordering, confirm all of the following:
The exact solar-input connector on the power station
Whether the station requires XT60, XT60i, or another variant
The specific Anderson family and size, if applicable
Correct positive and negative polarity
Maximum panel open-circuit voltage allowed by the station
Maximum input current allowed by the station
Maximum solar charging wattage
Cable length and wire gauge
Outdoor suitability and connector protection
Whether the cable is supplied or recommended by the power-station manufacturer
A product listing should show connector photos and clearly state the cable’s wiring. If it only says “fits most power stations,” treat that as a reason to verify further, not as proof of compatibility.
What to do if the cable does not fit
If the connector will not seat easily, stop. Do not sand, shave, force, or modify the plug. Recheck the connector type and inspect for a cap, locking ring, damaged housing, or an adapter left on the panel lead.
If the connector fits but the station does not begin charging:
Confirm the panel is in sunlight and connected in the correct direction.
Check the power station’s solar-input screen or indicator.
Recheck polarity and all intermediate connections.
Compare the panel voltage with the station’s required input range.
Try the manufacturer-supplied cable, if available.
Inspect the cable for bent contacts, cuts, loose strain relief, or heat damage.
If the wiring or input limits remain uncertain, contact the power-station or cable manufacturer. Do not connect a solar array that may exceed the station’s voltage or current limits.
When an adapter is the right choice
An adapter is reasonable when the panel and power station use different, clearly identified connector systems and the adapter preserves correct polarity and suitable electrical ratings. For example, an MC4-to-XT60 cable can be appropriate when the panel uses MC4 and the station specifically accepts XT60.
A direct manufacturer-supplied cable is usually preferable when available. It reduces the number of connections and makes polarity and compatibility easier to verify. For unusual Anderson connectors, proprietary inputs, or multi-panel arrays, use the manufacturer’s cable or obtain confirmation before ordering.
Bottom line
Choose the cable by the complete specification—not by the words “Anderson” or “XT60” alone. Identify the exact power-station input, match the panel-side connector, verify polarity, and make sure the solar array stays within the station’s voltage, current, and wattage limits. If any of those details are unknown, the cable is not ready to buy yet.
FAQ
Can I use an XT60 cable with an Anderson solar input?
Not directly. XT60 and Anderson are different connector systems, so you need a purpose-built adapter or cable with the correct connector on each end. Confirm the exact Anderson family, polarity, and electrical ratings first.
Are all Anderson connectors interchangeable?
No. Anderson is a connector family name, and different housings, contact sizes, keying arrangements, and current ratings may not match. Identify the exact connector type used by the power station.
Is MC4 to XT60 the same as MC4 to XT60i?
They are not automatically the same for every power station. Check the station’s manual and cable requirements, because some XT60i inputs use an additional sensing connection or a specific cable configuration.
How do I know whether a solar cable is electrically safe for my power station?
Compare the solar panel’s open-circuit voltage and current with the power station’s maximum solar-input voltage and current. Also check total wattage and the effect of series or parallel wiring. If the values are unclear or close to the limits, follow the manufacturer’s guidance before connecting it.