The best portable power station for your existing solar panels is the one whose solar input matches your array safely and whose battery and inverter are large enough for the appliances you need to run.
If you already own solar panels, choose the portable power station around the panels—not the other way around. The most important checks are the panel array’s operating voltage, open-circuit voltage, current, connector, and total wattage. Then match the station’s solar-input limits, battery capacity, inverter output, and charging features to your intended use.
A station with a large battery is not automatically a good match. If its solar input cannot accept your array safely or efficiently, you may need different wiring, an adapter, fewer panels, or a separate charge controller.
Start with your solar panel specifications
Find the label or specification sheet for each panel. Record these values:
Operating voltage (Vmp): The approximate voltage the panel produces under load.
Open-circuit voltage (Voc): The panel’s maximum unloaded voltage. This is the critical number for avoiding an over-voltage condition.
Operating current (Imp): The approximate current produced while charging.
Short-circuit current (Isc): The maximum current under a specific test condition.
Rated power: Usually calculated as voltage multiplied by current.
Connector type and polarity: Many portable systems use a common DC connector, but physical fit does not guarantee electrical compatibility.
If you have multiple panels, calculate the array rather than relying only on the wattage printed on one panel.
Panels in series
Series wiring increases voltage while current stays approximately the same. For two matching panels, the array voltage is roughly doubled. This can help an array reach the station’s minimum solar-charging voltage, but the combined Voc must remain below the station’s maximum solar input voltage, including a margin for cold conditions.
Panels in parallel
Parallel wiring increases current while voltage stays approximately the same. This can provide more charging power without raising voltage, but the combined current must stay within the station’s maximum solar input current.
Do not assume that two panels can be connected in either configuration. Follow the panel, connector, and power-station manufacturer instructions. If the wiring requires exposed conductors, unfamiliar connectors, or custom changes, ask a qualified solar or electrical professional.
Match the station’s solar input
The station’s solar-input specifications should be your first filter. Compare your array with all of these limits:
Maximum solar voltage
Your array’s maximum possible voltage must stay below the station’s maximum solar input voltage. Use the array’s combined Voc, not just its operating voltage, when checking this limit. Panel voltage can also rise in cold weather.
An over-voltage condition can damage the charging circuitry and may not be covered by the warranty. Never exceed the published maximum simply because the station appears to accept power when connected.
Minimum solar voltage
Some stations need a minimum voltage before solar charging begins. A single low-voltage panel may not meet that threshold, especially in weak sunlight. Series wiring can solve this in some setups, but only if the resulting voltage remains within the station’s safe range.
Maximum solar current
The station may limit current automatically, but the array still needs to be compatible with the input specifications. Parallel panels can exceed the station’s maximum current even when the voltage is correct.
Maximum solar wattage
A station may list a solar input limit in watts. More panel wattage can reduce charging time, but the station may cap the incoming power. Oversizing the array is sometimes useful for maintaining charging in clouds, but it does not necessarily make the battery charge at the full panel rating.
Check whether the manufacturer permits panels with a higher rated wattage than the input limit. If it does not, stay within the stated limit.
Product prices and availability are accurate as of the date/time indicated and are subject to change. Any price and availability information displayed on Amazon.com at the time of purchase will apply to the purchase of this product.
Choose battery capacity for the job
After confirming solar compatibility, size the battery around what you want to run.
Battery capacity is commonly listed in watt-hours (Wh). A rough runtime estimate is:
The usable fraction accounts for inverter losses and the fact that you generally should not drain a battery completely. Actual runtime varies with temperature, battery condition, appliance cycling, and the station’s efficiency.
For example, a refrigerator does not normally draw its maximum running wattage continuously. It cycles on and off, but its compressor can require a higher startup surge. A station intended for refrigerator backup should therefore have enough continuous inverter output and surge capacity, not just enough total watt-hours.
Practical capacity guidance
Small battery: Useful for phones, lights, routers, and small electronics.
Mid-size battery: Better for longer device use, portable cooking equipment with modest power demands, or short refrigerator backup.
Large battery: More suitable for extended outages, refrigerators, medical equipment that permits portable-power use, and several devices at once.
Use the appliance nameplate or manufacturer specifications where possible. Do not rely on battery capacity alone when running heating elements, pumps, compressors, or tools.
Product prices and availability are accurate as of the date/time indicated and are subject to change. Any price and availability information displayed on Amazon.com at the time of purchase will apply to the purchase of this product.
Check inverter output and surge capacity
The inverter converts the station’s battery power into household AC power. Two ratings matter:
Continuous output: The power the station can supply over time.
Surge or peak output: The temporary power available when a motor or compressor starts.
Add the running wattage of devices you may use simultaneously. Then check the startup requirements of motor-driven equipment such as refrigerators, freezers, sump pumps, fans, and power tools.
A pure sine-wave inverter is generally the safer choice for sensitive electronics and equipment with motors. Follow the appliance manufacturer’s instructions, especially for medical devices, heating equipment, and refrigeration.
Make sure the connectors and adapters are appropriate
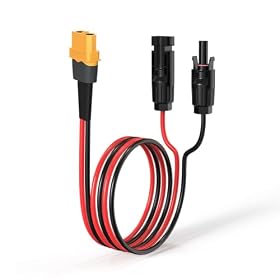
Existing solar panels may use a connector that does not plug directly into the station. An adapter can be acceptable when it is specifically intended for the equipment and preserves correct polarity, voltage, and current handling.
Before buying an adapter, verify:
Connector type on the panels and station.
Positive and negative polarity.
Voltage and current rating.
Wire size and outdoor suitability.
Whether the station manufacturer permits that connection.
Do not connect a bare solar panel directly to an AC outlet, and do not use an improvised cable. A connector that fits mechanically may still be wired incorrectly or rated for inadequate current.
Look for these station features
MPPT solar charging
An MPPT, or maximum power point tracking, controller adjusts the electrical operating point to harvest useful power as sunlight changes. It is especially valuable when solar conditions vary or when your array operates at a higher voltage than the battery.
Pass-through power
Pass-through operation lets the station power connected devices while charging. This can be useful during an outage, but the feature may have limitations and can increase battery cycling. Check the manual before using it as a permanent, unattended backup system.
Expandable batteries
An expansion battery can increase runtime without replacing the main station. Confirm that expansion batteries are compatible with the exact station and understand whether expansion changes the available AC output, charging time, weight, or warranty requirements.
Solar charging speed
Compare the station’s maximum solar input with your array’s realistic output. A high input limit does not guarantee fast charging if the panels are shaded, angled poorly, dirty, or unable to provide the required voltage.
Display and monitoring
A clear display showing solar watts, battery percentage, input voltage, and output power makes it easier to diagnose a mismatch. App monitoring can also help, but it should not replace the station’s published electrical specifications.
A simple selection process
Use this order when comparing stations:
Calculate the panel array’s voltage, current, and wattage.
Reject any station whose solar voltage or current limits do not safely accommodate the array.
Confirm the connector, polarity, and approved cable configuration.
Estimate the watt-hours required for your devices.
Check continuous and surge inverter output.
Compare solar charging speed, battery expansion, weight, and noise.
Choose the smallest station that meets the electrical requirements with reasonable reserve.
A larger station may be worthwhile if you need longer outage coverage, but it can be heavier and may take longer to recharge from a modest solar array.
Common compatibility problems
The station does not start solar charging
Check that the panel voltage reaches the station’s minimum input voltage. Inspect the cable and connectors, confirm polarity, remove unnecessary adapters, and try the panels in full sun. If the array voltage is too low, series wiring may help only when permitted and when the resulting voltage remains safe.
Solar input shows power but charging is slow
Clouds, shade, poor panel angle, dirt, high temperatures, and a full or nearly full battery can all reduce charging power. Also check whether the station is limiting input to its maximum rated wattage.
The station displays an over-voltage warning
Disconnect the array and recalculate the combined Voc, particularly if panels are wired in series. Do not reconnect until the voltage is within the station’s published range. If the warning remains with a verified compatible array, contact the manufacturer.
An adapter gets hot
Stop using it. Heat can indicate excessive current, a loose connection, undersized wiring, damaged contacts, or a poor-quality adapter. Replace it with a properly rated cable or have the setup inspected by a qualified professional.
The station powers the refrigerator but shuts down
The refrigerator may be exceeding the inverter’s startup or continuous limit, or the battery may be too depleted. Disconnect other loads, allow the compressor to start again, and compare the refrigerator requirements with the station’s continuous and surge ratings. A dedicated refrigerator backup setup may be more appropriate than a general-purpose station.
When your existing panels are not a good match
A different portable power station—or a separate compatible charge controller—may be more sensible when your panels have unusually high voltage, low voltage, a proprietary connector, or a configuration that cannot meet the station’s input limits.
Replacing the panels is not automatically necessary. In some cases, changing a series connection to parallel, using an approved adapter, or selecting a station with a wider solar-input range solves the issue. Do not modify the panel wiring solely to increase wattage without checking voltage and current limits.
The best station for existing solar panels is the one that safely accepts your array, provides enough usable battery capacity, and has an inverter suited to your actual appliances. Solar-input compatibility should come before brand, display features, or maximum battery size.
FAQ
Can I use my existing solar panels with any portable power station?
No. The panel array must be compatible with the station’s solar-input voltage, current, wattage, connector, and polarity requirements. The station’s maximum input voltage is especially important because exceeding it can damage the charging circuitry.
Is higher solar wattage always better for a portable power station?
No. More panel wattage can help in weak sunlight, but the station may cap incoming power. The array must also remain within the station’s voltage and current limits.
Should I connect solar panels in series or parallel?
Series wiring raises voltage, while parallel wiring raises current. Choose the configuration only after comparing the resulting voltage and current with the station’s solar-input limits, including the array’s combined open-circuit voltage.
Can a portable power station run a refrigerator during an outage?
It can if the station has enough usable battery capacity, continuous inverter output, and startup surge capacity. Refrigerator runtime depends on cycling, temperature, efficiency, and other connected loads, so nameplate requirements and the station manual should be checked.